A fresh Linux VPS gets scanned for open SSH within minutes of getting a public IP. I once watched the auth log on a brand-new Hetzner box record over 400 root password attempts in the first hour. That part hasn’t changed in years. What’s changed is my answer to it.
The old Linux server security baseline was SSH keys plus UFW with port 22 open to the world. It still works. But in 2026, if your servers sit on a mesh VPN like Tailscale, there’s no good reason to expose SSH to the public internet at all. The strongest version of this baseline isn’t a better lock on the front door. It’s taking the door off the public side of the building.
This post covers both: the setup I actually run now (SSH bound to the tailnet, a non-root sudo user, root and password auth off, MeshCentral as a private recovery path), and the classic public-SSH flow as a fallback for servers that aren’t on a tailnet yet.
The 2026 Linux server security baseline: public SSH is gone
Start with the hierarchy, because it frames every decision below it.
- Best: SSH listens only on the Tailscale IP. The daemon binds to the server’s tailnet address. Port 22 is invisible from the public internet, so the scanners never get a connection to brute-force in the first place.
- Good: public SSH, key-only, behind a firewall. For a server that isn’t on a tailnet yet, public SSH with key authentication and a default-deny firewall is still a solid baseline. It’s where most well-run servers on the internet sit.
- Avoid: public SSH with passwords or direct root login. This is the configuration the bots are built for, and the one that fills auth logs with the 400-attempts-an-hour noise.
Everything in this post moves a server up that list. If you can reach the top tier, do. If you can’t yet, the fallback section near the end gets you solidly into the middle.
SSH that listens only on the tailnet
Here’s the sshd_config that backs the top tier. It’s short:
ListenAddress 100.x.y.z
AllowUsers adminuser
PermitRootLogin no
PasswordAuthentication no
KbdInteractiveAuthentication no
PubkeyAuthentication yes
100.x.y.z is the server’s Tailscale IP, the address in the 100.64.0.0/10 range that Tailscale hands out, not the public VPS IP your provider assigned. Once ListenAddress points at the tailnet address, sshd stops accepting connections on the public interface entirely. A scanner hitting your public IP on port 22 gets nothing back. (Use your real tailnet IP in the file; I’m masking mine here for the obvious reason.)
AllowUsers adminuser narrows logins to exactly one account. Even on the tailnet, I don’t want every system user to be a valid SSH target.
Two things to get right before you rely on this:
Boot ordering. If sshd starts before tailscaled has brought the interface up, ListenAddress 100.x.y.z has nothing to bind to and the SSH service fails to start. On a reboot that can leave you with no SSH at all until you fix it from the provider console. Make sshd wait for the tailnet: a small systemd drop-in that adds After=tailscaled.service plus a readiness gate (an ExecStartPre that polls tailscale ip until the address exists) keeps the boot order honest. Tailscale’s own docs cover the wait pattern for services that bind to the tailnet address.
This is OpenSSH over Tailscale, not Tailscale SSH. They’re different features and easy to confuse. Tailscale SSH is a built-in capability that intercepts port 22 on the tailnet address and authenticates against your tailnet identity and ACLs, so you stop managing authorized_keys by hand. What I’m describing is ordinary OpenSSH that happens to bind to the Tailscale IP: your keys, your sshd_config, your AllowUsers. I keep plain OpenSSH because the tooling is the same one I’ve trusted for a decade, but Tailscale SSH is a legitimate choice if you’d rather let the tailnet own authentication.
Generating an SSH key with Ed25519
You generate a keypair once per machine and reuse it for every server you operate.
On macOS, Linux, or Windows PowerShell:
ssh-keygen -t ed25519 -a 64 -C "admin@laptop"Ed25519 is the default I reach for in 2026. The keys are tiny, the signatures are fast, and there’s no practical attack against the algorithm. The -a 64 flag sets the number of KDF rounds protecting the private key on disk, so a stolen laptop doesn’t hand over a usable key. The -C comment is just a label; I use user@device so I can tell keys apart later.
RSA-4096 (ssh-keygen -t rsa -b 4096) is the compatibility fallback, and only that. If you have to reach an appliance or a legacy host that predates Ed25519 support, keep an RSA key for it. For everything modern, Ed25519 is the better default.
Press enter to accept the default path (~/.ssh/id_ed25519 and ~/.ssh/id_ed25519.pub) and set a passphrase when prompted. The passphrase encrypts the private key at rest.
Warning: Running
ssh-keygenwithout a custom filename overwrites an existing key at the default path. If you’ve used SSH before, checkls ~/.ssh/first and use-f ~/.ssh/id_ed25519_newserverto write to a new path instead.
Print the public half (the .pub file) to copy onto the server:
cat ~/.ssh/id_ed25519.pubOn Windows the path is C:\Users\<your-username>\.ssh\id_ed25519.pub. The contents are one line starting with ssh-ed25519 AAAA.... Copy the whole line. Most SSH clients (Termius, Tabby, PuTTYgen) can generate the same keys through a GUI; just don’t use any cloud-sync feature that uploads the private key. Keys live on the device that made them.
Adding your key to the server
Two paths, depending on your provider.
The clean path: most cloud dashboards (Hetzner, DigitalOcean, OVH, Vultr) let you paste the public key into the UI before the server is created. The image boots with your key already in /root/.ssh/authorized_keys, and you SSH in as root on first boot. I take this path whenever the provider supports it.
The manual path: if not, log in as root with the provider’s temporary password, then:
mkdir -p ~/.ssh
nano ~/.ssh/authorized_keys
Paste the public key on a single line, save with Ctrl+O, exit with Ctrl+X, then fix the permissions, because sshd is fussy about them:
chmod 700 ~/.ssh
chmod 600 ~/.ssh/authorized_keys
In a second terminal, test it: ssh root@your.server.ip should let you straight in with no password prompt. A password prompt means the permissions or the key contents are wrong. Don’t move on until key login works.
Creating a non-root sudo user
Root is convenient and dangerous. A typo in an rm -rf runs against the whole filesystem with no warning. The convention is to do daily work as a normal user with sudo, and reserve direct root for the rare case (most of which sudo -i covers anyway). This is also the account AllowUsers will name.
Create the user, swapping simon for your username:
adduser simonThe password it asks for is what sudo will prompt for later, not what SSH uses, so make it strong and store it in your password manager. Press enter through the optional fields.
Grant sudo:
usermod -aG sudo simonCopy your key into the new user’s home, cleanest from the new user’s own session:
su - simon
mkdir -p ~/.ssh
nano ~/.ssh/authorized_keys
Paste the same public key, save, exit, set the permissions:
chmod 700 ~/.ssh
chmod 600 ~/.ssh/authorized_keys
In a second terminal, confirm the new user can log in (ssh simon@your.server.ip) and then run sudo whoami inside that session; it should print root. When both work, you’re ready to lock down sshd.
Warning: Don’t log out of your root session until the sudo user can both SSH in and run sudo. Locking yourself out of a fresh VPS is a 30-second mistake that costs 30 minutes of console recovery.
Locking down sshd_config
This file controls the SSH daemon. Open it:
sudo nano /etc/ssh/sshd_configThe directives that matter, whether you’re binding to the tailnet or running public SSH:
PermitRootLogin no
PasswordAuthentication no
KbdInteractiveAuthentication no
PubkeyAuthentication yes
AllowUsers simon
PermitRootLogin no stops root logging in over SSH. PasswordAuthentication no and KbdInteractiveAuthentication no together close the password door; the second one matters because some PAM setups still offer an interactive password prompt even with the first set. PubkeyAuthentication yes keeps key auth on, and AllowUsers limits who can log in at all. If you’re on the tailnet, add the ListenAddress 100.x.y.z line from earlier.
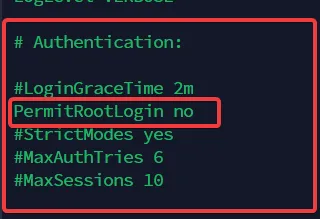
The PermitRootLogin directive flipped to no. After this, root cannot open an SSH session directly.
If you’re migrating a server where legacy users still log in with passwords, leave PasswordAuthentication yes for the moment, finish moving them to keys, then come back and flip it.

The transitional state with password auth still on. Fine for the hour you spend migrating users; not the long-term setting.
Once every account has its key in place, lock it to public-key only:
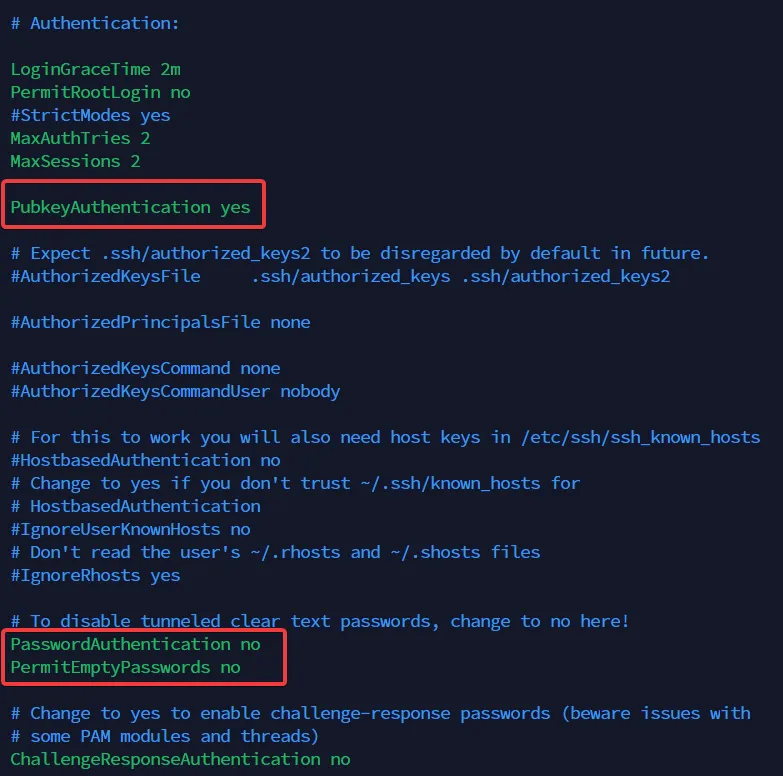
The end state I run on every box: root login off, password auth off, public-key only. Brute-force traffic against this config is wasted bytes.
Before you reload, validate the file. This one habit has saved me from more lockouts than anything else:
sudo sshd -tIf sshd -t prints nothing, the syntax is good. If it complains, fix the line it names before you go further; a typo here is how a reload turns into a dead daemon. Then reload, which I prefer over restart so existing sessions survive a mistake:
sudo systemctl reload ssh.serviceIn a second terminal, test all three outcomes: root over SSH should be refused, your sudo user with the key should get in, and an explicit password attempt (ssh -o PreferredAuthentications=password simon@your.server.ip) should be refused. If all three behave, sshd is done.
Fallback access: MeshCentral over the tailnet
SSH on the tailnet has one failure mode worth planning for: what happens when SSH itself is what broke? A bad sshd_config change that somehow passed sshd -t, a tailscaled update that hiccups, a firewall edit that strands the port. If SSH is your only way in, any of those becomes a console-recovery ticket with your provider.
So I keep a second, independent way onto the box: MeshCentral, a self-hosted remote management server, reachable only over the tailnet. It gives me a browser-based terminal and remote desktop to the machine through its own agent, on a completely different path from SSH. When SSH is healthy I never touch it. When SSH is the thing that’s down, it’s the difference between a 30-second fix and a support ticket.
The rules that make this safe rather than a liability:
- Tailnet-only. The MeshCentral server and its agents are reachable through Tailscale, never published to the public internet. An exposed remote-management panel is a worse problem than the one it solves.
- Strong auth and 2FA. MeshCentral supports TOTP and hardware 2FA, account lockouts, and IP filtering. Turn them on. This is a keys-to-the-kingdom tool.
- Break-glass, not daily admin. Daily work happens over SSH on the tailnet. MeshCentral is the recovery plane you reach for when the daily path is broken. Keeping the two separate is the whole point.
That separation, a daily admin path and an independent recovery path, both private, is the part most single-server setups skip until the first lockout teaches them why it matters. The deeper walkthroughs are in MeshCentral as an open-source RMM and the self-hosted remote management guide.
Where UFW fits in the 2026 model
UFW didn’t stop being useful. It stopped being the center of the model.
When SSH only listens on the tailnet, UFW is no longer what protects SSH; the public internet can’t reach the port whether UFW is running or not. I no longer rely on UFW for SSH for that reason. What UFW still does well is everything that genuinely faces the public: HTTP on 80, HTTPS on 443, and any service you haven’t moved onto the tailnet. On a public-facing web server it’s still part of the build. It’s just no longer the thing standing between the scanners and your shell.
One caveat catches people, and it’s gotten more common as everything moves into containers:
Docker can publish ports straight past UFW. When you publish a container port (-p 5432:5432 or a ports: mapping), Docker writes its own iptables rules ahead of UFW’s chain, so the port is reachable from the public internet even when ufw status swears it’s denied. If a server runs Docker, do not publish databases or admin panels to 0.0.0.0. Bind them to localhost (127.0.0.1:5432:5432) or to the tailnet IP, and reach them over the tailnet. Assuming UFW covers Docker is how a “firewalled” Postgres ends up indexed by Shodan.
One more note on IPv6, because the old version of this post had a long workflow for it that isn’t worth the space: if you don’t intentionally use IPv6, don’t build your baseline around it. Either configure it properly or disable it deliberately. The thing to avoid is a half-configured IPv6 path that nobody monitors, where v6 traffic walks past rules you only wrote for v4.
The public-SSH fallback (if you’re not on a tailnet yet)
If a server isn’t on a tailnet, the middle tier from the top of this post (public SSH, key-only, behind a default-deny firewall) is your baseline, and UFW is how you build it.
Install it:
sudo apt install ufw -yIf you don’t use IPv6 on this server, disable it in UFW’s config so v6 traffic can’t slip past your v4 rules:
sudo nano /etc/default/ufwSet IPV6=no, save, exit.
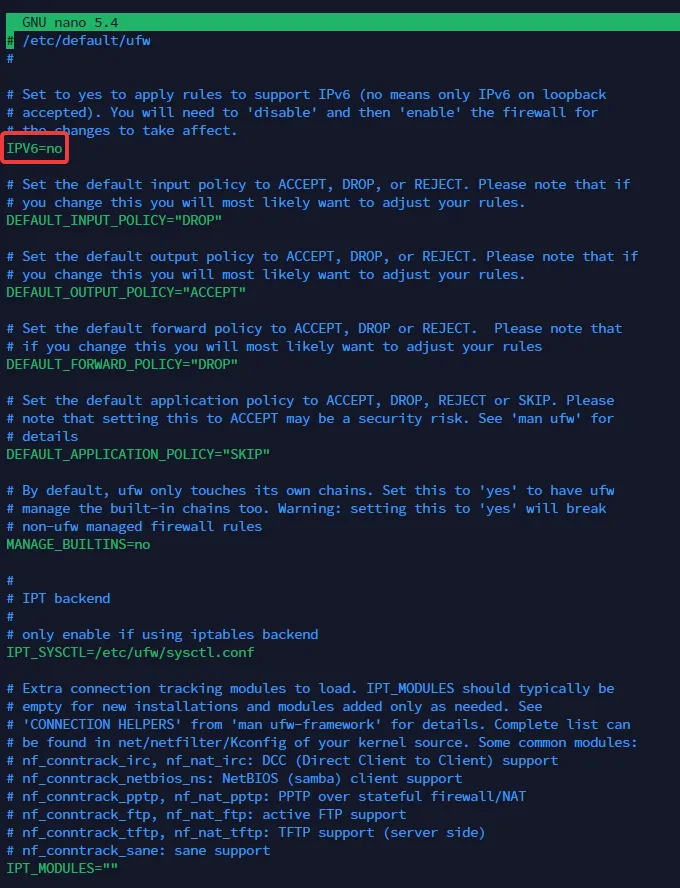
The IPV6 directive set to no in /etc/default/ufw. Skip this if the server actually serves IPv6 traffic.
Reset to a known state, then set default-deny inbound and allow outbound:
sudo ufw reset
sudo ufw default deny incoming
sudo ufw default allow outgoing
Allow the ports a public web server needs:
sudo ufw allow 22 && sudo ufw allow http && sudo ufw allow httpsIf you have a static office IP, tighten SSH to that source only (be very sure of the IP; this is another way to lock yourself out of a fresh box):
sudo ufw allow from 203.0.113.42 to any port 22Enable it and confirm:
sudo ufw enable
sudo ufw status numbered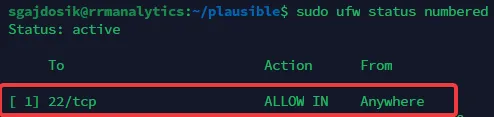
The expected ufw status numbered output: 22, 80, and 443 allowed inbound, everything else denied.
Make sure it starts on boot:
sudo systemctl enable ufwThat’s the middle-tier baseline. When you’re ready to move the server onto a tailnet, bind sshd to the tailnet IP and you can close 22 to the public entirely.
What to install next, and what to skip
This baseline gets a server off the bottom of every scanner’s list. The next layer in my standard build is CrowdSec, which adds behavioural detection on top of the firewall: it watches auth logs, web server logs, and (with bouncers) Nginx itself, and bans IPs that act like attacks. There’s a follow-up specifically for WordPress sites.
Things I deliberately skip on a single-server agency setup:
- AppArmor / SELinux profile tuning. Worth it on multi-tenant infrastructure, overkill on a single web host. The default Ubuntu AppArmor profiles are already on; leave them.
- Custom kernel sysctl hardening. The defaults in modern Ubuntu kernels are fine. The marginal gain doesn’t justify the debugging surface.
- Disabling root with
passwd -l. I leave the root account active forsudo -i. Disabling it is theatre on a server nobody can SSH into as root anyway.
What I do add after hardening: unattended-upgrades for security patches, and the mesh VPN itself as the admin plane rather than an afterthought. Tailscale is what I run; NetBird is a solid self-hosted alternative, and a plain WireGuard setup or Mistborn will get you there too. 2FA goes on every dashboard the server fronts, with 2FAuth and Authentik closing the rest of the loop.
For why the human layer matters as much as the server layer, the human element in cybersecurity defense post is the companion to this one. Running WordPress on top? The comprehensive WordPress security guide covers the application layer next. And if your fleet includes Windows boxes, the equivalent baseline is in Windows Server hardening with DoD STIGs, SCAP, LGPO, and ESET.
Closing the loop
The 2026 Linux server security baseline is shorter than the fear around it suggests. Put the server on a tailnet, bind SSH to the tailnet IP, generate an Ed25519 key, disable root and password and keyboard-interactive auth, name one sudo user, and keep MeshCentral on the tailnet as the recovery path. UFW stays on for whatever still faces the public, and Docker gets watched so it doesn’t publish past it.
The shift from the old baseline comes down to one idea: stop exposing SSH to the public internet, and the single biggest attack surface on the box goes with it. Intrusion detection, log analysis, and application rules all stack on top of that, and they earn their keep once that surface is gone.
If you’ve been running servers with port 22 open to the world out of habit, the right time to move them onto the tailnet is before the next provisioning, not after the next incident.